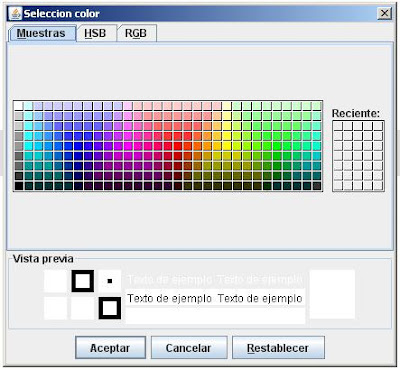
JColorChooser permite mostrar una ventana para que el usuario seleccione un color de entre todas la gama de colores disponibles. Utilizaremos la Ide Netbeans 7.1 para crear la interface grafica (un JFrame con un JButton dentro). Debe quedar algo parecido a esto: Codigo:// Tabla de selector de colores: JColorChooserpackage colores1;
import java.awt.Color;import javax.swing.JColorChooser;
public class Colores1 extends javax.swing.JFrame { public Colores1() { initComponents(); this.setLocationRelativeTo(null); //centrar pantalla } private void initComponents() { //Codigo generado por Netbeans al crear la interface grafica manualmente...}private void JButtonCargarColoresActionPerformed(java.awt.event.ActionEvent evt) {Color c = JColorChooser.showDialog(this, "Seleccion color" , Color.white);
if(c != null) getContentPane().setBackground(c); } public static void main(String args[]) { java.awt.EventQueue.invokeLater(new Runnable(){ public void run() { new Colores1().setVisible(true); } }); } // Variables declaration - do not modify private javax.swing.JButton JButtonCargarColores; // End of variables declaration }Resultado:
·
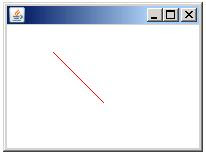
Código Java (LineaRoja.java):
// Gráficos - Dibujar una línea roja: setColor, drawLine.
package linearoja;
import java.awt.Frame;
import java.awt.Graphics;
import java.awt.Color;
public class LineaRoja extends Frame {
public LineaRoja() {
this.setSize(200, 150);
this.setVisible(true);
}
@Override
public void paint(Graphics g) {
g.setColor(Color.RED);
g.drawLine(50, 50, 100, 100);
}
public static void main(String[] args) {
LineaRoja p = new LineaRoja();
}
}
Resultado:
·
Descripción:JFileChooser permite mostrar una ventana para que el usuario navegue por los directorios y elija un fichero. En este ejemplo se muestran ficheros de tipo imagen. Utilizaremos la ide Netbeans 7.1 para crear la interface grafica (un JFrame con un JButton dentro). Debe quedar algo parecido a esto:
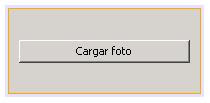 Codigo:// Navegar por los directorios: JFileChooserpackage imagenes1;import java.io.File;import java.io.FilenameFilter;import javax.swing.JFileChooser;import javax.swing.filechooser.FileNameExtensionFilter;public class Imagenes1 extends javax.swing.JFrame { private File[] fotos;public Imagenes1() { initComponents();this.setLocationRelativeTo(null); //centrar pantalla}@SuppressWarnings("unchecked")private void initComponents() {//Aqui va el codigo generado automaticamente por Netbeans al crear la interface grafica manualmente (un JFrame con un JButton dentro).}private void JButtonCargarFotoActionPerformed(java.awt.event.ActionEvent evt) {JFileChooser fc = new JFileChooser(); fc.setFileFilter(new FileNameExtensionFilter("Archivos de imagen","tif","jpg","jpeg","png","gif"));int opcion = fc.showDialog(this, "Abrir");
if (opcion == JFileChooser.APPROVE_OPTION) { File file = fc.getSelectedFile(); this.cargaDirectorio(file.getParent()); }}private void cargaDirectorio(String folder){ File dir = new File(folder);
if (dir.isDirectory()){this.fotos = dir.listFiles(new FilenameFilter(){public boolean accept(File file, String nombre){if (nombre.endsWith(".tif" ) || nombre.endsWith(".jpg" ) ||nombre.endsWith(".jpeg") || nombre.endsWith(".gif" ) ||nombre.endsWith(".png")) { return true; }return false; }});} //cierre if} public static void main(String args[]) { java.awt.EventQueue.invokeLater(new Runnable(){ public void run() { new Imagenes1().setVisible(true); } }); }// Variables declaration - do not modify private javax.swing.JButton JButtonCargarFoto; // End of variables declaration }Resultado: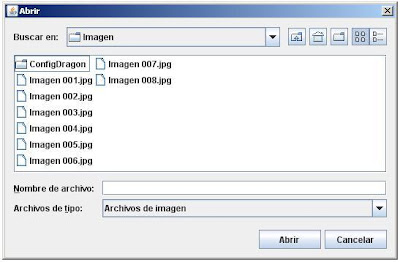 ·
·
Codigo://Cambio de formato de números decimales:package javaapplication;import java.text.DecimalFormat;import java.text.ParseException;
public class JavaApplication { public static void main(String[] args) { try { double num = 9999.888888; DecimalFormat fd = new DecimalFormat("#0.###"); num = fd.parse(fd.format(num)).doubleValue(); System.out.println(num); } catch (ParseException ex) { } }}Resultado:run:9999.889BUILD SUCCESSFUL (total time: 0 seconds)·
//Pasar de String a int: String str = "100"; int num = Integer.parseInt(str);//Pasar String a double:String str = "12.35";double num = Double.parseDouble(str);//Pasar String a float:String str = "12.35";float num = Float.parseFloat(str);//Pasar cualquier tipo de variable numérica a un String:int num = 100;String str = String.valueOf(num);//O bien:int num = 100;String str = "" + num;·
Codigo://Crear un hilo con la clase Threadpackage hilos2;class Hilo2 extends Thread{ Hilo2(){ super("segundo"); start(); }
public void run() { try { for(int i=0; i<5; i++){ System.out.println((Thread.currentThread()).getName()+" hilo aqui..."); Thread.sleep(1000); } } catch (InterruptedException ex) {} System.out.println("Final del segundo hilo"); }}public class Hilos2 { public static void main(String[] args) { new Hilo2(); try { for(int i=0; i<5; i++){ System.out.println((Thread.currentThread()).getName()+" hilo aqui..."); Thread.sleep(1000); } } catch (InterruptedException ex) {} }}Resultado:run:main hilo aqui...segundo hilo aqui...segundo hilo aqui...main hilo aqui...segundo hilo aqui...main hilo aqui...main hilo aqui...segundo hilo aqui...main hilo aqui...segundo hilo aqui...Final del segundo hiloBUILD SUCCESSFUL (total time: 5 seconds)·
Codigo://Crear un hilo con interface Runnablepackage hilos1;
class Hilo2 implements Runnable { Thread hilo2; Hilo2() { hilo2 = new Thread(this, "segundo"); System.out.println("Inicio segundo hilo"); hilo2.start();//Inicia segundo hilo } public void run() { try { for(int i=0; i<5; i++){ System.out.println((Thread.currentThread()).getName()+" hilo aqui..."); Thread.sleep(1000); } } catch (InterruptedException ex) {} System.out.println("Final del segundo hilo"); }}class Hilos1 { public static void main(String[] args) { //Hilo principal (main) new Hilo2(); //Segundo hilo (segundo) try { for(int i=0; i<5; i++){ System.out.println((Thread.currentThread()).getName()+" hilo aqui..."); Thread.sleep(1000); } } catch (InterruptedException ex) {} } }Resultado:run:Inicio segundo hilomain hilo aqui...segundo hilo aqui...segundo hilo aqui...main hilo aqui...segundo hilo aqui...main hilo aqui...main hilo aqui...segundo hilo aqui...main hilo aqui...segundo hilo aqui...Final del segundo hiloBUILD SUCCESSFUL (total time: 5 seconds)·


