Codigo:
//Ordenacion ascendente de un vector
package ordenacion1;
public class Ordenacion1 {
public static void main(String[] args) {
int[] vNumeros = {99, 3, 15, 12, 75, 10};
System.out.println("Vector inicial: " + MostrarVector(vNumeros));
int aux;
for (int i = 0; i < vNumeros.length; i++) {
for (int j = 0; j < vNumeros.length && j != i; j++) {
if (vNumeros[i] < vNumeros[j]) {
aux = vNumeros[i];
vNumeros[i] = vNumeros[j];
vNumeros[j] = aux;
}
}
}
System.out.println("Vector ordenado: " + MostrarVector(vNumeros));
}
private static String MostrarVector(int[] vNumeros) {
String str = "";
for (int i = 0; i < vNumeros.length; i++) {
str += vNumeros[i] + " ";
}
return str;
}
}
Resultado:
run:
Vector inicial: 99 3 15 12 75 10
Vector ordenado: 3 10 12 15 75 99
BUILD SUCCESSFUL (total time: 0 seconds)
Una forma sencilla y rápida de aprender JAVA, observando y deduciendo cómo se comporta el lenguaje a través de ejemplos prácticos.
Archivo del blog
sábado, 29 de diciembre de 2012
viernes, 28 de diciembre de 2012
Conversión aplicación java a applet con Netbeans.
Con Netbeans se crea un nuevo proyecto y le agregamos un jFrame Form. Nos genera automaticamente un codigo del cual para pasar a modo applet hay que eliminar lo marcado en rojo y agregar lo que esta en verde.
Codigo:
package javaapplication3;
public class NewJFrame extends javax.swing.JFrame {
public class NewJFrame extends javax.swing.JApplet {
public NewJFrame() {
public void init() {
initComponents();
}
@SuppressWarnings("unchecked")
private void initComponents() {
setDefaultCloseOperation(javax.swing.WindowConstants.EXIT_ON_CLOSE);
javax.swing.GroupLayout layout = new javax.swing.GroupLayout(getContentPane());
getContentPane().setLayout(layout);
layout.setHorizontalGroup(layout.createParallelGroup(javax.swing.GroupLayout.Alignment.LEADING).addGap(0, 400, Short.MAX_VALUE));
layout.setVerticalGroup(layout.createParallelGroup(javax.swing.GroupLayout.Alignment.LEADING).addGap(0, 300, Short.MAX_VALUE));
pack();
}
public static void main(String args[]) {
java.awt.EventQueue.invokeLater(new Runnable() {
public void run() {
new NewJFrame().setVisible(true);
}
});
}
// Variables declaration - do not modify
// End of variables declaration
}
Resultado:
Codigo:
package javaapplication3;
public class NewJFrame extends javax.swing.JApplet {
public void init() {
initComponents();
}
@SuppressWarnings("unchecked")
private void initComponents() {
javax.swing.GroupLayout layout = new javax.swing.GroupLayout(getContentPane());
getContentPane().setLayout(layout);
layout.setHorizontalGroup(layout.createParallelGroup(javax.swing.GroupLayout.Alignment.LEADING).addGap(0, 400, Short.MAX_VALUE));
layout.setVerticalGroup(layout.createParallelGroup(javax.swing.GroupLayout.Alignment.LEADING).addGap(0, 300, Short.MAX_VALUE));
}
// Variables declaration - do not modify
// End of variables declaration
}
Resultado:
Nota:
Para ejecutarlo hay que darle al "Run File" o pulsar Mayúsculas + F6. En la carpeta "build" de nuestro proyecto encontramos el archivo HTML donde podremos ver nuestro Applet desde el navegador de internet.
martes, 25 de septiembre de 2012
Evaluar expresión Postfija usando pilas.
Codigo:
// Evaluar expresión en notación Postfija (solo num enteros)
package evalpost;
import java.util.Stack;
public class EvalPost {
public static void main(String[] args) {
//Entrada (Expresión en Postfija)
String expr = "2 23 6 + * 1 -"; // equivale a 2*(23+6)-1
String[] post = expr.split(" ");
//Declaración de las pilas
Stack < String >E = new Stack < String > (); //Pila entrada
Stack < String >P = new Stack < String > (); //Pila de operandos
//Añadir post (array) a la Pila de entrada (E)
for (int i = post.length - 1; i >= 0; i--) {
E.push(post[i]);
}
//Algoritmo de Evaluación Postfija
String operadores = "+-*/%";
while (!E.isEmpty()) {
if (operadores.contains("" + E.peek())) {
P.push(evaluar(E.pop(), P.pop(), P.pop()) + "");
}else {
P.push(E.pop());
}
}
//Mostrar resultados:
System.out.println("Expresion: " + expr);
System.out.println("Resultado: " + P.peek());
}
private static int evaluar(String op, String n2, String n1) {
int num1 = Integer.parseInt(n1);
int num2 = Integer.parseInt(n2);
if (op.equals("+")) return (num1 + num2);
if (op.equals("-")) return (num1 - num2);
if (op.equals("*")) return (num1 * num2);
if (op.equals("/")) return (num1 / num2);
if (op.equals("%")) return (num1 % num2);
return 0;
}
}
Resultado:
run:
Expresion: 2 23 6 + * 1 -
Resultado: 57
BUILD SUCCESSFUL (total time: 0 seconds)
.
// Evaluar expresión en notación Postfija (solo num enteros)
package evalpost;
import java.util.Stack;
public class EvalPost {
public static void main(String[] args) {
//Entrada (Expresión en Postfija)
String expr = "2 23 6 + * 1 -"; // equivale a 2*(23+6)-1
String[] post = expr.split(" ");
//Declaración de las pilas
Stack < String >
Stack < String >
//Añadir post (array) a la Pila de entrada (E)
for (int i = post.length - 1; i >= 0; i--) {
E.push(post[i]);
}
//Algoritmo de Evaluación Postfija
String operadores = "+-*/%";
while (!E.isEmpty()) {
if (operadores.contains("" + E.peek())) {
P.push(evaluar(E.pop(), P.pop(), P.pop()) + "");
}else {
P.push(E.pop());
}
}
//Mostrar resultados:
System.out.println("Expresion: " + expr);
System.out.println("Resultado: " + P.peek());
}
private static int evaluar(String op, String n2, String n1) {
int num1 = Integer.parseInt(n1);
int num2 = Integer.parseInt(n2);
if (op.equals("+")) return (num1 + num2);
if (op.equals("-")) return (num1 - num2);
if (op.equals("*")) return (num1 * num2);
if (op.equals("/")) return (num1 / num2);
if (op.equals("%")) return (num1 % num2);
return 0;
}
}
Resultado:
run:
Expresion: 2 23 6 + * 1 -
Resultado: 57
BUILD SUCCESSFUL (total time: 0 seconds)
.
viernes, 21 de septiembre de 2012
Conversión de Infijo a Postfijo usando pilas
Ver referencia: Infijo-Posfijo
Codigo:
//Conversión de notación Infija a Postfija mediante uso de pilas
package infixpostfix4;
import java.util.Scanner;
import java.util.Stack;
public class InfixPostfix4 {
public static void main(String[] args) {
//Entrada de datos
System.out.println("*Escribe una expresión algebraica: ");
Scanner leer = new Scanner(System.in);
//Depurar la expresion algebraica
String expr = depurar(leer.nextLine());
String[] arrayInfix = expr.split(" ");
//Declaración de las pilas
Stack < String > E = new Stack < String > (); //Pila entrada
Stack < String > P = new Stack < String > (); //Pila temporal para operadores
Stack < String > S = new Stack < String > (); //Pila salida
//Añadir la array a la Pila de entrada (E)
for (int i = arrayInfix.length - 1; i >= 0; i--) {
E.push(arrayInfix[i]);
}
try {
//Algoritmo Infijo a Postfijo
while (!E.isEmpty()) {
switch (pref(E.peek())){
case 1:
P.push(E.pop());
break;
case 3:
case 4:
while(pref(P.peek()) >= pref(E.peek())) {
S.push(P.pop());
}
P.push(E.pop());
break;
case 2:
while(!P.peek().equals("(")) {
S.push(P.pop());
}
P.pop();
E.pop();
break;
default:
S.push(E.pop());
}
}
//Eliminacion de `impurezas´ en la expresiones algebraicas
String infix = expr.replace(" ", "");
String postfix = S.toString().replaceAll("[\\]\\[,]", "");
//Mostrar resultados:
System.out.println("Expresion Infija: " + infix);
System.out.println("Expresion Postfija: " + postfix);
}catch(Exception ex){
System.out.println("Error en la expresión algebraica");
System.err.println(ex);
}
}
//Depurar expresión algebraica
private static String depurar(String s) {
s = s.replaceAll("\\s+", ""); //Elimina espacios en blanco
s = "(" + s + ")";
String simbols = "+-*/()";
String str = "";
//Deja espacios entre operadores
for (int i = 0; i < s.length(); i++) {
if (simbols.contains("" + s.charAt(i))) {
str += " " + s.charAt(i) + " ";
}else str += s.charAt(i);
}
return str.replaceAll("\\s+", " ").trim();
}
//Jerarquia de los operadores
private static int pref(String op) {
int prf = 99;
if (op.equals("^")) prf = 5;
if (op.equals("*") || op.equals("/")) prf = 4;
if (op.equals("+") || op.equals("-")) prf = 3;
if (op.equals(")")) prf = 2;
if (op.equals("(")) prf = 1;
return prf;
}
}
Resultado:
run:
*Escribe una expresión algebraica:
2*(23+6)-1
Expresion Infija: (2*(23+6)-1)
Expresion Postfija: 2 23 6 + * 1 -
BUILD SUCCESSFUL (total time: 4 seconds)
Codigo:
//Conversión de notación Infija a Postfija mediante uso de pilas
package infixpostfix4;
import java.util.Scanner;
import java.util.Stack;
public class InfixPostfix4 {
public static void main(String[] args) {
//Entrada de datos
System.out.println("*Escribe una expresión algebraica: ");
Scanner leer = new Scanner(System.in);
//Depurar la expresion algebraica
String expr = depurar(leer.nextLine());
String[] arrayInfix = expr.split(" ");
//Declaración de las pilas
Stack
Stack
Stack
//Añadir la array a la Pila de entrada (E)
for (int i = arrayInfix.length - 1; i >= 0; i--) {
E.push(arrayInfix[i]);
}
try {
//Algoritmo Infijo a Postfijo
while (!E.isEmpty()) {
switch (pref(E.peek())){
case 1:
P.push(E.pop());
break;
case 3:
case 4:
while(pref(P.peek()) >= pref(E.peek())) {
S.push(P.pop());
}
P.push(E.pop());
break;
case 2:
while(!P.peek().equals("(")) {
S.push(P.pop());
}
P.pop();
E.pop();
break;
default:
S.push(E.pop());
}
}
//Eliminacion de `impurezas´ en la expresiones algebraicas
String infix = expr.replace(" ", "");
String postfix = S.toString().replaceAll("[\\]\\[,]", "");
//Mostrar resultados:
System.out.println("Expresion Infija: " + infix);
System.out.println("Expresion Postfija: " + postfix);
}catch(Exception ex){
System.out.println("Error en la expresión algebraica");
System.err.println(ex);
}
}
//Depurar expresión algebraica
private static String depurar(String s) {
s = s.replaceAll("\\s+", ""); //Elimina espacios en blanco
s = "(" + s + ")";
String simbols = "+-*/()";
String str = "";
//Deja espacios entre operadores
for (int i = 0; i < s.length(); i++) {
if (simbols.contains("" + s.charAt(i))) {
str += " " + s.charAt(i) + " ";
}else str += s.charAt(i);
}
return str.replaceAll("\\s+", " ").trim();
}
//Jerarquia de los operadores
private static int pref(String op) {
int prf = 99;
if (op.equals("^")) prf = 5;
if (op.equals("*") || op.equals("/")) prf = 4;
if (op.equals("+") || op.equals("-")) prf = 3;
if (op.equals(")")) prf = 2;
if (op.equals("(")) prf = 1;
return prf;
}
}
Resultado:
run:
*Escribe una expresión algebraica:
2*(23+6)-1
Expresion Infija: (2*(23+6)-1)
Expresion Postfija: 2 23 6 + * 1 -
BUILD SUCCESSFUL (total time: 4 seconds)
jueves, 20 de septiembre de 2012
Primeros pasos para conversión notación Infija a Postfija.
La notación Postfija es un método algebraico alternativo de introducción de datos que permite reducir el acceso a la memoria del ordenador, sobretodo en calculos masivos y complejos ya que los cálculos se realizan secuencialmente según se van introduciendo los operadores (en vez de tener que esperar a escribir la expresión al completo).
Basicamente consiste en que en una expresión de ese tipo primero están los operandos y después viene el operador.
Ej:
"3+5" pasado a notación Postfija seria: "3 5 +"
* Pasos para la conversión Infijo a Postfijo usando pilas.
P = pila temporal para los operadores
S = pila de salida
1.- Añadir “(” al principio y “)” al final de EXPR. Seguidamente agregar uno a uno todos los parametros de EXPR a la Pila E.
2.- Examinar E de izquierda a derecha y repetir los pasos 3 a 6 para cada elemento de E hasta que esta quede vacía.
3.- Si se encuentra “(”, meterlo en P.
4.- Si se encuentra un OPERADOR (+,-,*,/,^) entonces:
(a) Repetidamente sacar de P y añadir a S cada operador (de la cima de P) que tenga la misma precedencia o mayor que el operador de E.
(b) Añadir OPERADOR a P.
[Fin de condicional]
5.- Si se encuentra un “)”, entonces:
(a) Repetidamente sacar de P y añadir a S cada operador (de la cima de P), hasta que encuentre un “(”.
(b) Eliminar el “(” de P (no añadir a S).
[Fin de condicional]
6.- Si se encuentra un OPERANDO (2,23,6…), añadirlo a S.
[Fin del Bucle]
7.- Salir.
Nota: Los operadores siguen la siguiente jerarquía (El de arriba es el que tiene mayor jerarquía hasta abajo el que tiene la menor):
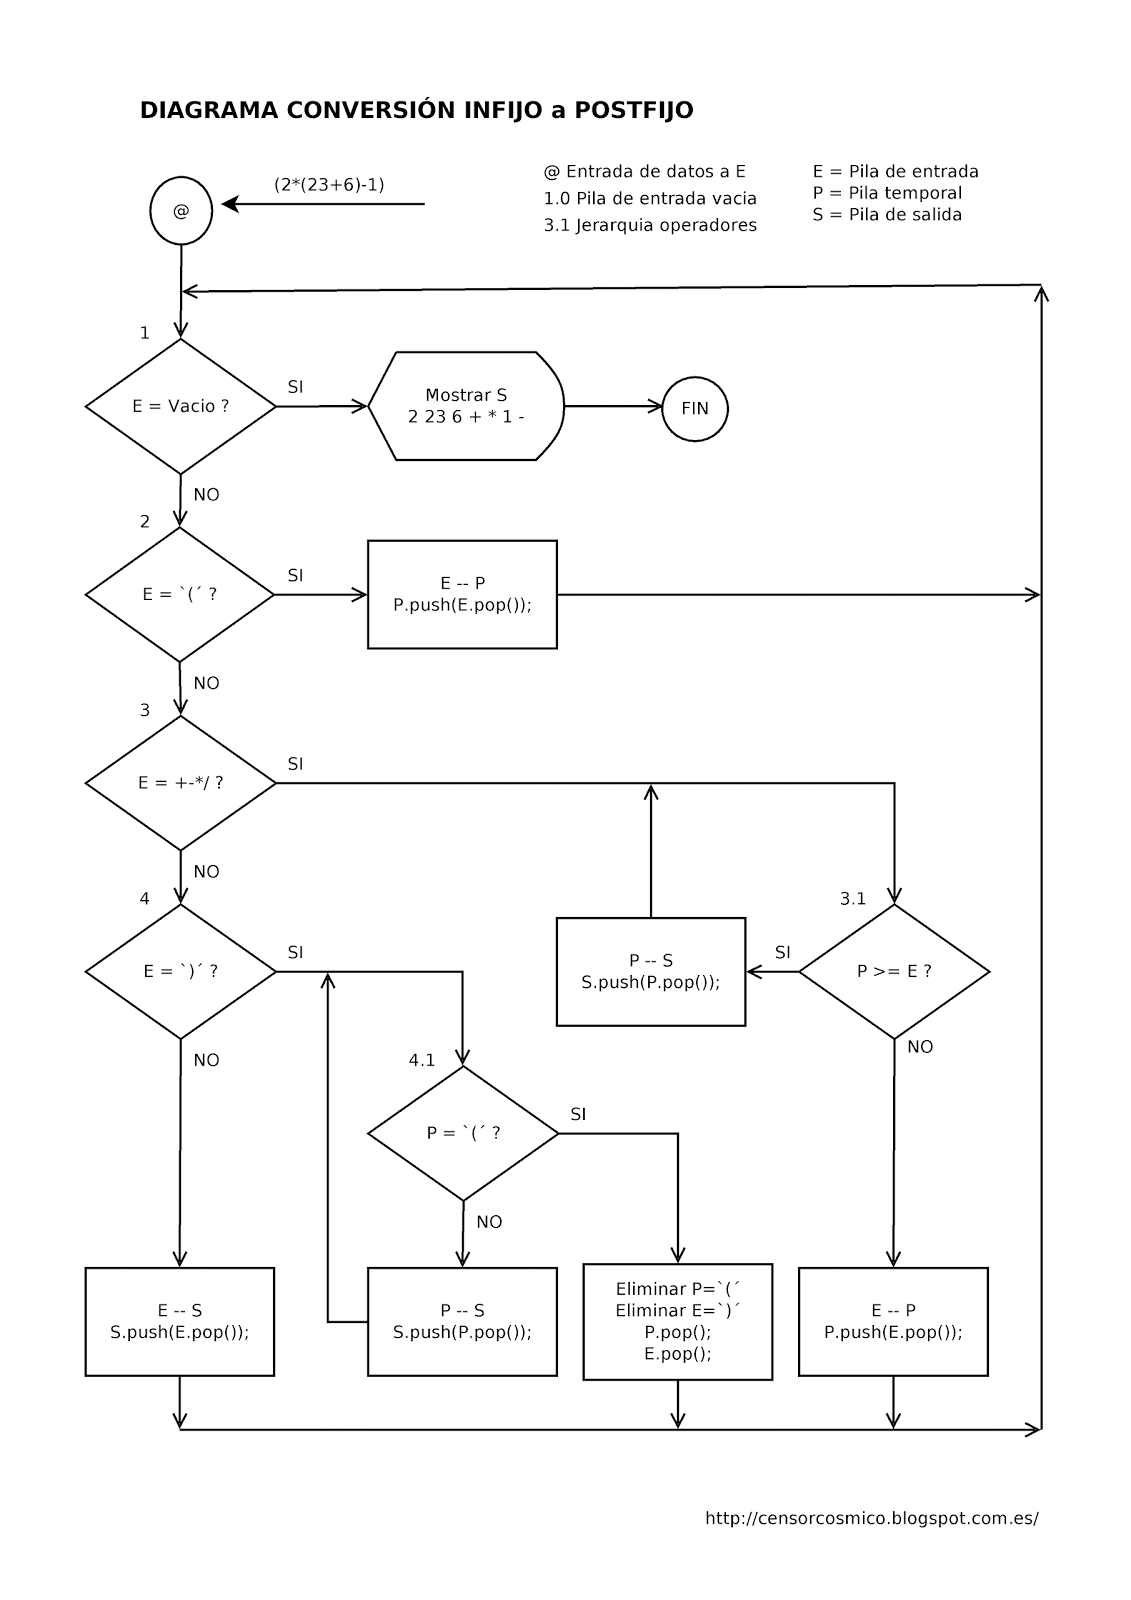
* Diagrama de flujo:
Basicamente consiste en que en una expresión de ese tipo primero están los operandos y después viene el operador.
Ej:
EXPR = Expresión aritmética notación infija ( Ej: 2*(23+6)-1 )
E = pila de entradaP = pila temporal para los operadores
S = pila de salida
(,2,*,(,23,+,6,),-,1,)
2.- Examinar E de izquierda a derecha y repetir los pasos 3 a 6 para cada elemento de E hasta que esta quede vacía.
3.- Si se encuentra “(”, meterlo en P.
4.- Si se encuentra un OPERADOR (+,-,*,/,^) entonces:
(a) Repetidamente sacar de P y añadir a S cada operador (de la cima de P) que tenga la misma precedencia o mayor que el operador de E.
(b) Añadir OPERADOR a P.
[Fin de condicional]
5.- Si se encuentra un “)”, entonces:
(a) Repetidamente sacar de P y añadir a S cada operador (de la cima de P), hasta que encuentre un “(”.
(b) Eliminar el “(” de P (no añadir a S).
[Fin de condicional]
6.- Si se encuentra un OPERANDO (2,23,6…), añadirlo a S.
[Fin del Bucle]
7.- Salir.
Nota: Los operadores siguen la siguiente jerarquía (El de arriba es el que tiene mayor jerarquía hasta abajo el que tiene la menor):
- ^
- * /
- + -
- )
- (
* Diagrama de flujo:
lunes, 25 de junio de 2012
Pilas: Comandos básicos (push, pop, peek, empty)
Codigo:
//Pilas: Comandos basicos (push, pop, peek, empty)
package pilas;
import java.util.Stack;
public class Pilas {
public static void main(String[] args) {
package pilas;
import java.util.Stack;
public class Pilas {
public static void main(String[] args) {
Stack
//apila 3 elementos
pila.push("elemento1");
pila.push("elemento2");
pila.push("elemento3");
System.out.println("1- push: " + pila);
//retira elemento que esta en la cima de la pila
pila.pop();
System.out.println("2- pop: " + pila);
//devuelve el elemento que esta en la cima de la pila
String x = pila.peek();
System.out.println("3- peek: " + x);
//devuelve cierto si la pila esta vacia
boolean y = pila.empty();
System.out.println("4- empty: " + y);
}
}
Resultado:
run:
1- push: [elemento1, elemento2, elemento3]
2- pop: [elemento1, elemento2]
3- peek: elemento2
4- empty: false
BUILD SUCCESSFUL (total time: 0 seconds)
1- push: [elemento1, elemento2, elemento3]
2- pop: [elemento1, elemento2]
3- peek: elemento2
4- empty: false
BUILD SUCCESSFUL (total time: 0 seconds)
Pilas: Apliar/Desapilar palabras en una pila.
Codigo:
//Pilas: Apilar/Desapilar strings
package pilas;
import java.util.Stack;
public class Pilas {
public static void main(String[] args) {
//Crear pila (en inglés Stack) para datos de tipo String.
Stack < String >pila = new Stack < String >();
//apliando en la pila
pila.push("primero");
System.out.println("\nIr apilando:\n" + pila);
pila.push("segundo");
System.out.println(pila);
pila.push("tercero");
System.out.println(pila);
//desapilando en la pila
pila.pop();
System.out.println("\nIr desapilando:\n" + pila);
pila.pop();
System.out.println(pila);
pila.pop();
System.out.println(pila);
}
}
package pilas;
import java.util.Stack;
public class Pilas {
public static void main(String[] args) {
//Crear pila (en inglés Stack) para datos de tipo String.
Stack < String >
//apliando en la pila
pila.push("primero");
System.out.println("\nIr apilando:\n" + pila);
pila.push("segundo");
System.out.println(pila);
pila.push("tercero");
System.out.println(pila);
//desapilando en la pila
pila.pop();
System.out.println("\nIr desapilando:\n" + pila);
pila.pop();
System.out.println(pila);
pila.pop();
System.out.println(pila);
}
}
Resultado:
run:
Ir apilando:
[primero]
[primero, segundo]
[primero, segundo, tercero]
Ir desapilando:
[primero, segundo]
[primero]
[]
BUILD SUCCESSFUL (total time: 0 seconds)
lunes, 18 de junio de 2012
Permutaciones: Sin repetición / Importa orden. (forma recursiva)
Codigo:
//* Permutaciones (Forma recursiva)
//- Importa posición
//- Sin repetición
//- Requisito: R >= N
package permutacion2;
public class Permutacion2 {
public static void main(String[] args) {
String[] elementos = "a,b,c,d,e".split(",");
int n = 4; //Tipos para escoger
int r = elementos.length; //Elementos elegidos
Perm2(elementos, "", n, r);
}
private static void Perm2(String[] elem, String act, int n, int r) {
if (n == 0) {
System.out.println(act);
} else {
for (int i = 0; i < r; i++) {
if (!act.contains(elem[i])) { // Controla que no haya repeticiones
Perm2(elem, act + elem[i] + ", ", n - 1, r);
}
}
}
}
}
Resultado:
run:
a, b, c, d,
a, b, c, e,
a, b, d, c,
a, b, c, d,
a, b, c, e,
a, b, d, c,
...
...
...
e, d, b, c,
e, d, c, a,
e, d, c, b,
BUILD SUCCESSFUL (total time: 0 seconds)
e, d, c, a,
e, d, c, b,
BUILD SUCCESSFUL (total time: 0 seconds)
Permutaciones: Con repetición / Importa orden. (forma recursiva)
Codigo:
//* Permutaciones (Forma recursiva)
//- Importa posición
//- Con repetición
package permutacion1;
public class Permutacion1 {
public static void main(String[] args) {
String[] elementos = "a,b,c,d,e".split(",");
int n = 4; //Tipos para escoger
int r = elementos.length; //Elementos elegidos
Perm1(elementos, "", n, r);
}
private static void Perm1(String[] elem, String act, int n, int r) {
if (n == 0) {
System.out.println(act);
} else {
for (int i = 0; i < r; i++) {
Perm1(elem, act + elem[i] + ", ", n - 1, r);
}
}
}
}
a, a, a, a,
a, a, a, b,
a, a, a, c,
...
...
...
e, e, e, c, e, e, e, d,
e, e, e, e,
BUILD SUCCESSFUL (total time: 0 seconds)
domingo, 3 de junio de 2012
Obtener el resultado numérico de una formula contenida en un string: eval.
Codigo:
//Obtener el resultado de una formula que esta contenida en una variable de tipo string: eval.
package formula;
import javax.script.ScriptEngine;
import javax.script.ScriptEngineManager;
import javax.script.ScriptException;
public class Formula {
public static void main(String[] args) {
ScriptEngineManager mgr = new ScriptEngineManager();
ScriptEngine engine = mgr.getEngineByName("JavaScript");
try {
String formula = "5-3+6*(10/2)";
System.out.println(formula + " = " + engine.eval(formula));
} catch (ScriptException ex) {}
}
}
Resultado:
run:
5-3+6*(10/2) = 32.0
BUILD SUCCESSFUL (total time: 0 seconds)
5-3+6*(10/2) = 32.0
BUILD SUCCESSFUL (total time: 0 seconds)
miércoles, 9 de mayo de 2012
Imprimir un jPanel y con todos sus componentes internos.
Usando el Netbeans creamos un jDialog y le agregamos un jPanel. Dentro de ese jPanel le agregamos por ejemplo una jTable, un label y un jButton. Tal y como muestra la siguiente captura:
Codigo:
//Imprimir un jPanel y con todos sus componentes internos.
package imprimir;
import java.awt.Graphics;
import java.awt.Graphics2D;
import java.awt.print.PageFormat;
import java.awt.print.Printable;
import java.awt.print.PrinterException;
import java.awt.print.PrinterJob;
public class Impresiones extends javax.swing.JDialog implements Printable {
public Impresiones(java.awt.Frame parent, boolean modal) {
initComponents();
}
private void initComponents() {...}//aqui va codigo generado por Netbeans
private void jButton1ActionPerformed(java.awt.event.ActionEvent evt) {
try {
PrinterJob job = PrinterJob.getPrinterJob();
job.setPrintable(this);
job.printDialog();
job.print();
} catch (PrinterException ex) { }
}
public static void main(String args[]) {
java.awt.EventQueue.invokeLater(new Runnable() {
public void run() {
Impresiones dialog = new Impresiones(new javax.swing.JFrame(), true);
dialog.addWindowListener(new java.awt.event.WindowAdapter() {
public void windowClosing(java.awt.event.WindowEvent e) {
System.exit(0);
}
});
dialog.setVisible(true);
}
});
}
// Variables declaration - do not modify
private javax.swing.JButton jButton1;
private javax.swing.JLabel jLabel1;
private javax.swing.JPanel jPanel1;
private javax.swing.JScrollPane jScrollPane1;
private javax.swing.JTable jTable1;
// End of variables declaration
public int print(Graphics graphics, PageFormat pageFormat, int pageIndex) throws PrinterException {
if (pageIndex > 0) return NO_SUCH_PAGE;
Graphics2D g2d = (Graphics2D)graphics;
//Punto donde empezará a imprimir dentro la pagina (100, 50)
g2d.translate( pageFormat.getImageableX()+100,
pageFormat.getImageableY()+50);
g2d.scale(0.50,0.50); //Reducción de la impresión al 50%
jPanel1.printAll(graphics);
return PAGE_EXISTS;
}
}
Resultado:
Impresión de un jTable
Usando Netbeans creamos un jFrame y le agregamos con la "Palette" un jTable y un jButton.
Codigo:
// Impresión de un jTable
package imprimirtabla;
import java.awt.print.PrinterException;
public class ImprimirTabla extends javax.swing.JFrame {
public ImprimirTabla() {
initComponents();
}
import java.awt.print.PrinterException;
public class ImprimirTabla extends javax.swing.JFrame {
public ImprimirTabla() {
initComponents();
}
private void initComponents() {...} // Aqui va el codigo generado por Netbeans.
private void jButton1ActionPerformed(java.awt.event.ActionEvent evt) {
try {
jTable1.print(); // Imprime el jTable
} catch (PrinterException ex) { }
}
public static void main(String args[]) {
java.awt.EventQueue.invokeLater(new Runnable() {
public void run() {
new ImprimirTabla().setVisible(true);
}
});
}
// Variables declaration - do not modify
private javax.swing.JButton jButton1;
private javax.swing.JScrollPane jScrollPane1;
private javax.swing.JTable jTable1;
// End of variables declaration
}
jueves, 19 de abril de 2012
Tabla de selector de colores: JColorChooser
JColorChooser permite mostrar una ventana para que el usuario seleccione un color de entre todas la gama de colores disponibles. Utilizaremos la Ide Netbeans 7.1 para crear la interface grafica (un JFrame con un JButton dentro). Debe quedar algo parecido a esto:

Codigo:
// Tabla de selector de colores: JColorChooser
package colores1;
import java.awt.Color;import javax.swing.JColorChooser;
public class Colores1 extends javax.swing.JFrame {
public Colores1() {
initComponents();
this.setLocationRelativeTo(null); //centrar pantalla
}
private void initComponents() {
//Codigo generado por Netbeans al crear la interface grafica manualmente...
}
private void JButtonCargarColoresActionPerformed(java.awt.event.ActionEvent evt) {
Color c = JColorChooser.showDialog(this, "Seleccion color" , Color.white);
if(c != null) getContentPane().setBackground(c);
}
public static void main(String args[]) {
java.awt.EventQueue.invokeLater(new Runnable(){
public void run() {
new Colores1().setVisible(true);
}
});
}
// Variables declaration - do not modify
private javax.swing.JButton JButtonCargarColores;
// End of variables declaration
}
Resultado:
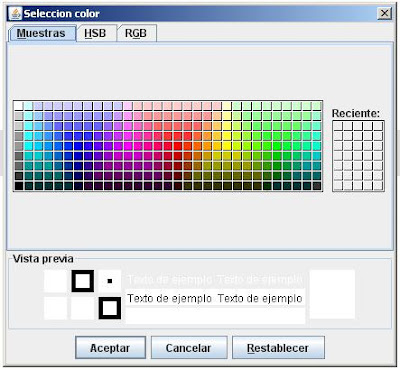
·

Codigo:
// Tabla de selector de colores: JColorChooser
package colores1;
import java.awt.Color;import javax.swing.JColorChooser;
public class Colores1 extends javax.swing.JFrame {
public Colores1() {
initComponents();
this.setLocationRelativeTo(null); //centrar pantalla
}
private void initComponents() {
//Codigo generado por Netbeans al crear la interface grafica manualmente...
}
private void JButtonCargarColoresActionPerformed(java.awt.event.ActionEvent evt) {
Color c = JColorChooser.showDialog(this, "Seleccion color" , Color.white);
if(c != null) getContentPane().setBackground(c);
}
public static void main(String args[]) {
java.awt.EventQueue.invokeLater(new Runnable(){
public void run() {
new Colores1().setVisible(true);
}
});
}
// Variables declaration - do not modify
private javax.swing.JButton JButtonCargarColores;
// End of variables declaration
}
Resultado:

·
lunes, 16 de abril de 2012
Gráficos: Dibujar una línea roja.
Código Java (LineaRoja.java):
// Gráficos - Dibujar una línea roja: setColor, drawLine.
package linearoja;
import java.awt.Frame;
import java.awt.Graphics;
import java.awt.Color;
public class LineaRoja extends Frame {
public LineaRoja() {
this.setSize(200, 150);
this.setVisible(true);
}
@Override
public void paint(Graphics g) {
g.setColor(Color.RED);
g.drawLine(50, 50, 100, 100);
}
public static void main(String[] args) {
LineaRoja p = new LineaRoja();
}
}
Resultado:
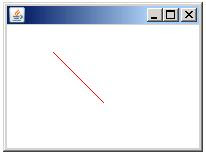
·
// Gráficos - Dibujar una línea roja: setColor, drawLine.
package linearoja;
import java.awt.Frame;
import java.awt.Graphics;
import java.awt.Color;
public class LineaRoja extends Frame {
public LineaRoja() {
this.setSize(200, 150);
this.setVisible(true);
}
@Override
public void paint(Graphics g) {
g.setColor(Color.RED);
g.drawLine(50, 50, 100, 100);
}
public static void main(String[] args) {
LineaRoja p = new LineaRoja();
}
}
Resultado:

·
martes, 10 de abril de 2012
Navegar por los directorios: JFileChooser
Descripción:
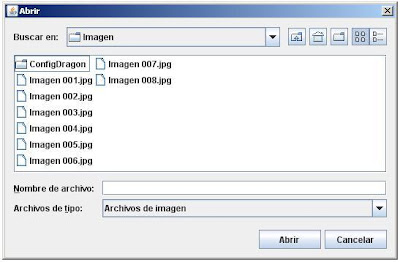
JFileChooser permite mostrar una ventana para que el usuario navegue por los directorios y elija un fichero. En este ejemplo se muestran ficheros de tipo imagen. Utilizaremos la ide Netbeans 7.1 para crear la interface grafica (un JFrame con un JButton dentro). Debe quedar algo parecido a esto:
Codigo:
// Navegar por los directorios: JFileChooser
package imagenes1;
import java.io.File;
import java.io.FilenameFilter;
import javax.swing.JFileChooser;
import javax.swing.filechooser.FileNameExtensionFilter;
public class Imagenes1 extends javax.swing.JFrame {
private File[] fotos;
public Imagenes1() {
initComponents();
this.setLocationRelativeTo(null); //centrar pantalla
}
@SuppressWarnings("unchecked")
private void initComponents() {
//Aqui va el codigo generado automaticamente por Netbeans al crear la interface grafica manualmente (un JFrame con un JButton dentro).
}
private void JButtonCargarFotoActionPerformed(java.awt.event.ActionEvent evt) {
JFileChooser fc = new JFileChooser();
fc.setFileFilter(new FileNameExtensionFilter("Archivos de imagen","tif","jpg","jpeg","png","gif"));
int opcion = fc.showDialog(this, "Abrir");
if (opcion == JFileChooser.APPROVE_OPTION) {
File file = fc.getSelectedFile();
this.cargaDirectorio(file.getParent());
}
}
private void cargaDirectorio(String folder){
File dir = new File(folder);
if (dir.isDirectory()){
this.fotos = dir.listFiles(new FilenameFilter(){
public boolean accept(File file, String nombre){
if (nombre.endsWith(".tif" ) || nombre.endsWith(".jpg" ) ||
nombre.endsWith(".jpeg") || nombre.endsWith(".gif" ) ||
nombre.endsWith(".png")) { return true; }
return false;
}
});
} //cierre if
}
public static void main(String args[]) {
java.awt.EventQueue.invokeLater(new Runnable(){
public void run() {
new Imagenes1().setVisible(true);
}
});
}
// Variables declaration - do not modify
private javax.swing.JButton JButtonCargarFoto;
// End of variables declaration
}
Resultado:
·
JFileChooser permite mostrar una ventana para que el usuario navegue por los directorios y elija un fichero. En este ejemplo se muestran ficheros de tipo imagen. Utilizaremos la ide Netbeans 7.1 para crear la interface grafica (un JFrame con un JButton dentro). Debe quedar algo parecido a esto:

Codigo:
// Navegar por los directorios: JFileChooser
package imagenes1;
import java.io.File;
import java.io.FilenameFilter;
import javax.swing.JFileChooser;
import javax.swing.filechooser.FileNameExtensionFilter;
public class Imagenes1 extends javax.swing.JFrame {
private File[] fotos;
public Imagenes1() {
initComponents();
this.setLocationRelativeTo(null); //centrar pantalla
}
@SuppressWarnings("unchecked")
private void initComponents() {
//Aqui va el codigo generado automaticamente por Netbeans al crear la interface grafica manualmente (un JFrame con un JButton dentro).
}
private void JButtonCargarFotoActionPerformed(java.awt.event.ActionEvent evt) {
JFileChooser fc = new JFileChooser();
fc.setFileFilter(new FileNameExtensionFilter("Archivos de imagen","tif","jpg","jpeg","png","gif"));
int opcion = fc.showDialog(this, "Abrir");
if (opcion == JFileChooser.APPROVE_OPTION) {
File file = fc.getSelectedFile();
this.cargaDirectorio(file.getParent());
}
}
private void cargaDirectorio(String folder){
File dir = new File(folder);
if (dir.isDirectory()){
this.fotos = dir.listFiles(new FilenameFilter(){
public boolean accept(File file, String nombre){
if (nombre.endsWith(".tif" ) || nombre.endsWith(".jpg" ) ||
nombre.endsWith(".jpeg") || nombre.endsWith(".gif" ) ||
nombre.endsWith(".png")) { return true; }
return false;
}
});
} //cierre if
}
public static void main(String args[]) {
java.awt.EventQueue.invokeLater(new Runnable(){
public void run() {
new Imagenes1().setVisible(true);
}
});
}
// Variables declaration - do not modify
private javax.swing.JButton JButtonCargarFoto;
// End of variables declaration
}
Resultado:

·
miércoles, 4 de abril de 2012
Cambio formato de un número decimal: DecimalFormat
Codigo:
//Cambio de formato de números decimales:
package javaapplication;
import java.text.DecimalFormat;
import java.text.ParseException;
public class JavaApplication {
public static void main(String[] args) {
try {
double num = 9999.888888;
DecimalFormat fd = new DecimalFormat("#0.###");
num = fd.parse(fd.format(num)).doubleValue();
System.out.println(num);
} catch (ParseException ex) { }
}
}
Resultado:
run:
9999.889
BUILD SUCCESSFUL (total time: 0 seconds)
·
Conversiones entre tipos de variables.
//Pasar de String a int:
String str = "100";
int num = Integer.parseInt(str);
//Pasar String a double:
String str = "12.35";
double num = Double.parseDouble(str);
//Pasar String a float:
String str = "12.35";
float num = Float.parseFloat(str);
//Pasar cualquier tipo de variable numérica a un String:
int num = 100;
String str = String.valueOf(num);
//O bien:
int num = 100;
String str = "" + num;
·
martes, 3 de abril de 2012
Hilos. Creando segundo hilo usando Thread.
Codigo:
//Crear un hilo con la clase Thread
package hilos2;
class Hilo2 extends Thread{
Hilo2(){
super("segundo");
start();
}
public void run() {
try {
for(int i=0; i<5; i++){
System.out.println((Thread.currentThread()).getName()+" hilo aqui...");
Thread.sleep(1000);
}
} catch (InterruptedException ex) {}
System.out.println("Final del segundo hilo");
}
}
public class Hilos2 {
public static void main(String[] args) {
new Hilo2();
try {
for(int i=0; i<5; i++){
System.out.println((Thread.currentThread()).getName()+" hilo aqui...");
Thread.sleep(1000);
}
} catch (InterruptedException ex) {}
}
}
Resultado:
run:
main hilo aqui...
segundo hilo aqui...
segundo hilo aqui...
main hilo aqui...
segundo hilo aqui...
main hilo aqui...
main hilo aqui...
segundo hilo aqui...
main hilo aqui...
segundo hilo aqui...
Final del segundo hilo
BUILD SUCCESSFUL (total time: 5 seconds)
·
Hilos: Creando segundo hilo usando Runnable.
Codigo:
//Crear un hilo con interface Runnable
package hilos1;
class Hilo2 implements Runnable {
Thread hilo2;
Hilo2() {
hilo2 = new Thread(this, "segundo");
System.out.println("Inicio segundo hilo");
hilo2.start();//Inicia segundo hilo
}
public void run() {
try {
for(int i=0; i<5; i++){
System.out.println((Thread.currentThread()).getName()+" hilo aqui...");
Thread.sleep(1000);
}
} catch (InterruptedException ex) {}
System.out.println("Final del segundo hilo");
}
}
class Hilos1 {
public static void main(String[] args) { //Hilo principal (main)
new Hilo2(); //Segundo hilo (segundo)
try {
for(int i=0; i<5; i++){
System.out.println((Thread.currentThread()).getName()+" hilo aqui...");
Thread.sleep(1000);
}
} catch (InterruptedException ex) {}
}
}
Resultado:
run:
Inicio segundo hilo
main hilo aqui...
segundo hilo aqui...
segundo hilo aqui...
main hilo aqui...
segundo hilo aqui...
main hilo aqui...
main hilo aqui...
segundo hilo aqui...
main hilo aqui...
segundo hilo aqui...
Final del segundo hilo
BUILD SUCCESSFUL (total time: 5 seconds)
·
lunes, 26 de marzo de 2012
Llamar a los constructores de una superclase.
Codigo:
//Llamar a los constructores de la superclase.
package javaapplication63;
class a{
a(){
System.out.println("En el constructor de a...");
}
a (String s){
System.out.println("En el constructor String de a...");
System.out.println(s);
}
}
class b extends a{
b(String s){
super(s);
System.out.println("En el constructor String de b...");
System.out.println(s);
}
}
public class JavaApplication63 {
public static void main(String[] args) {
b obj = new b("Hola");
}
}
Resultado:
run:
En el constructor String de a...
Hola
En el constructor String de b...
Hola
BUILD SUCCESSFUL (total time: 1 second)
·
Suscribirse a:
Comentarios (Atom)
Con la tecnología de Blogger.

